Best pattern making guide 2025: master fundamentals in 30 days
Aug 12, 2025TL;DR: Most people learn pattern making wrong - jump to complex techniques, buy expensive tools, quit week one. Pattern making = creating paper templates for garments. Needs precision, math skills, following steps. 30-day guide: Week 1 foundations, Week 2 flat drafting, Week 3 draping, Week 4 digital. Tools under $200. fashionINSTA shows where industry heading.
After 15 years in this industry, working with everyone from Max Mara to Timberland, I've watched countless people struggle to learn pattern making the wrong way. They jump straight into complex techniques, buy expensive tools they don't need, or worse, give up after the first week because it feels overwhelming.
Put simply, pattern making is the art of creating a paper pattern (or template) for your garment idea. It basically involves creating a blueprint of the garment design you have in mind on paper. But here's what nobody tells beginners: Pattern drafting requires a high degree of skill, and certain aptitudes and ambitions within the maker, for a successful pattern to be drafted.
The good news? You can absolutely learn this skill. You just need the right approach.
This 30-day guide breaks down pattern making into manageable daily steps. By the end of the month, you'll understand the fundamentals and have created your first complete pattern. No overwhelm, no expensive mistakes, just steady progress.
Key Takeaways:
→ Pattern reality: Paper templates for cutting fabric. Needs precision, fraction math, step-following ability. Tests if you have aptitude
→ Tools under $200: Pattern paper $30, measuring tools $35, marking $25, cutting $30. Skip $200 college kits
→ 30-day progression: Week 1 measurements/ease/grain, Week 2 flat drafting skirt, Week 3 draping bodice, Week 4 digital intro
→ Common mistakes: Forgetting seam allowances, wrong ease calculations, grain line confusion, skipping muslin test
→ Future path: AI market $2.23B growing 39% annually. fashionINSTA creates patterns in minutes. Join 1200+ learning modern methods
The fashion industry is facing unprecedented challenges in 2025, with a long-feared cyclical slowdown arriving and the negative environment predicted by many now materialized. 50% of fashion executives see generative AI as key for product discovery in 2025, making pattern making skills more valuable than ever.

Industry leaders are discussing how AI is transforming pattern making and product development in fashion.
What is pattern making in fashion?
Pattern making is the process of creating templates used to cut and assemble fabric into a finished garment. It involves drafting precise patterns that serve as blueprints for clothing construction.
Think of it this way: a pattern is a paper template used to trace out the shape of a garment unto a piece of fabric, after which the fabric is cut and assembled into a full garment.
But pattern making goes beyond just creating shapes. Creating patterns lets you see how a garment will fit the wearer. This helps to ensure accurate cutting and alignment during the sewing process. By using the same pattern for similar apparel designs, you will be fostering consistency across your product's collection.
The reality is that a pattern is the base level template for every item of clothing. However, as necessary as it is to fashion design, it is a challenging and very technical aspect of the process.
With the apparel market valued at $1.84 trillion in 2025 and experiencing a CAGR of 2.81% through 2028, understanding pattern making fundamentals positions you for success in this evolving industry.
Your essential tools shopping list (under $200)
Before we dive into the 30-day curriculum, let's get your tools sorted. When I started college for fashion design, they wanted us to buy a design toolkit they sold in their bookstore that cost about $200. And of course they made it seem like we couldn't make patterns or sew without their toolkit. But as a student who already had to spend money on tuition and textbooks, an extra $200 was not in the budget.
Here's the truth: You don't have to buy a $200 toolkit to start making your own sewing patterns. In fact, if you sew, you probably have most of the tools already.
Essential tools (Total: approximately $150)
Pattern paper ($20-30)Without paper, there is no pattern! Pattern making paper is sold in different styles. Start with plain pattern paper. You can find large rolls that will last months.
Measuring tools ($25-35)
-
Flexible measuring tape (essential)
-
Clear ruler (18-24 inches)
-
French curve ruler
-
L-square or T-square
Marking tools ($15-25)
-
Sharp pencils (2H and HB)
-
Fine-tip markers
-
Eraser
-
Awl or pattern punch
Cutting tools ($20-30)
-
Pattern scissors
-
Paper scissors
-
Craft knife
Additional supplies ($30-40)
-
Pattern weights or pins
-
Tracing wheel
-
Pattern notcher
-
Manila folders (for storing patterns)
Free alternatives for expensive equipment
Dress form alternative: Use yourself or a willing friend for measurements. Many successful pattern makers started this way.
CAD software alternative: Start with free software like Seamly2D or use graph paper for manual drafting.
Pattern weights: Use soup cans or small books instead of buying expensive weights.
Week 1: Foundation concepts
Day 1: Understanding measurements
Start by learning the 15 essential body measurements needed for pattern making. For good pattern making, accurate measurements are of utmost importance.
Exercise: Measure yourself or a fit model, recording:
-
Bust, waist, hip circumference
-
Shoulder width, arm length
-
Back width, front width
-
Waist to hip length
Create a measurement chart you'll reference throughout the month.
Day 2: What is ease?
A basic pattern, also known as a block pattern, corresponds directly to body measurements and has no wearing ease. Basic patterns are critical for achieving fit consistency across a brand.
Exercise: Compare a fitted t-shirt to an oversized sweater. Measure both and note the difference between body measurements and garment measurements. This difference is "ease."
Day 3: Grain lines matter
The grainline is a line on the pattern that indicates the fabric's grain. It ensures the garment hangs correctly when worn. Patterns must be aligned with the grainline for proper fit and drape.
Exercise: Cut fabric strips on different grain lines (lengthwise, crosswise, bias). Notice how each stretches and drapes differently.
Day 4: Pattern symbols and markings
Notches are small marks on the pattern edges. They help match pieces during sewing. Notches ensure accurate assembly of the garment.
Learn the standard symbols: notches, grain lines, fold lines, darts, and seam allowances.
Exercise: Study a commercial pattern and identify all symbols and markings.
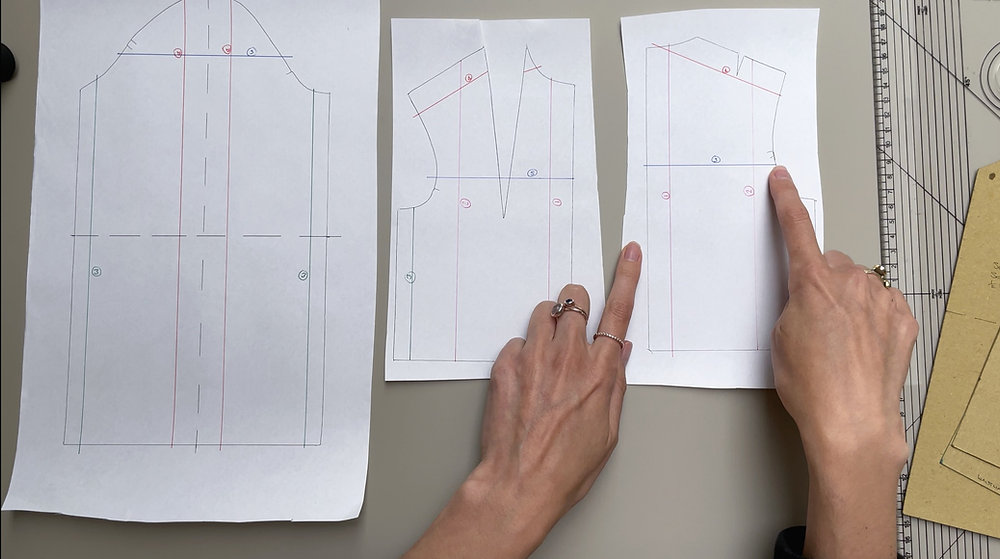
Pattern pieces showing technical markings and construction details essential for garment assembly.
Day 5: Seam allowances
Exercise: Add seam allowances to a simple rectangle pattern, understanding how different seam types require different allowances.
Day 6: Introduction to darts
Darts are folds sewn into fabric to give shape to the garment. They help the fabric conform to the body's curves. Commonly found in the bust, waist, and hip areas.
Exercise: Draw dart shapes on paper and practice folding them to see how they create three-dimensional shape from flat patterns.
Day 7: Week 1 review
Create a simple rectangular pattern with all elements: seam allowances, notches, grain line, and fold line. This becomes your reference template.
Week 2: Flat pattern drafting basics
Day 8: Creating your first basic block
The first blocks that you draft are a front bodice block, a back bodice block, a sleeve block, a skirt block, and a pant block. Most people start with the bodice front back and sleeve because that is the hardest part to fit. It's also challenging to draft, and this is going to teach you whether or not you want to proceed with patternmaking.
Start with a basic skirt block - it's simpler than a bodice but teaches all fundamental concepts.
Exercise: Draft a straight skirt front pattern using your measurements.
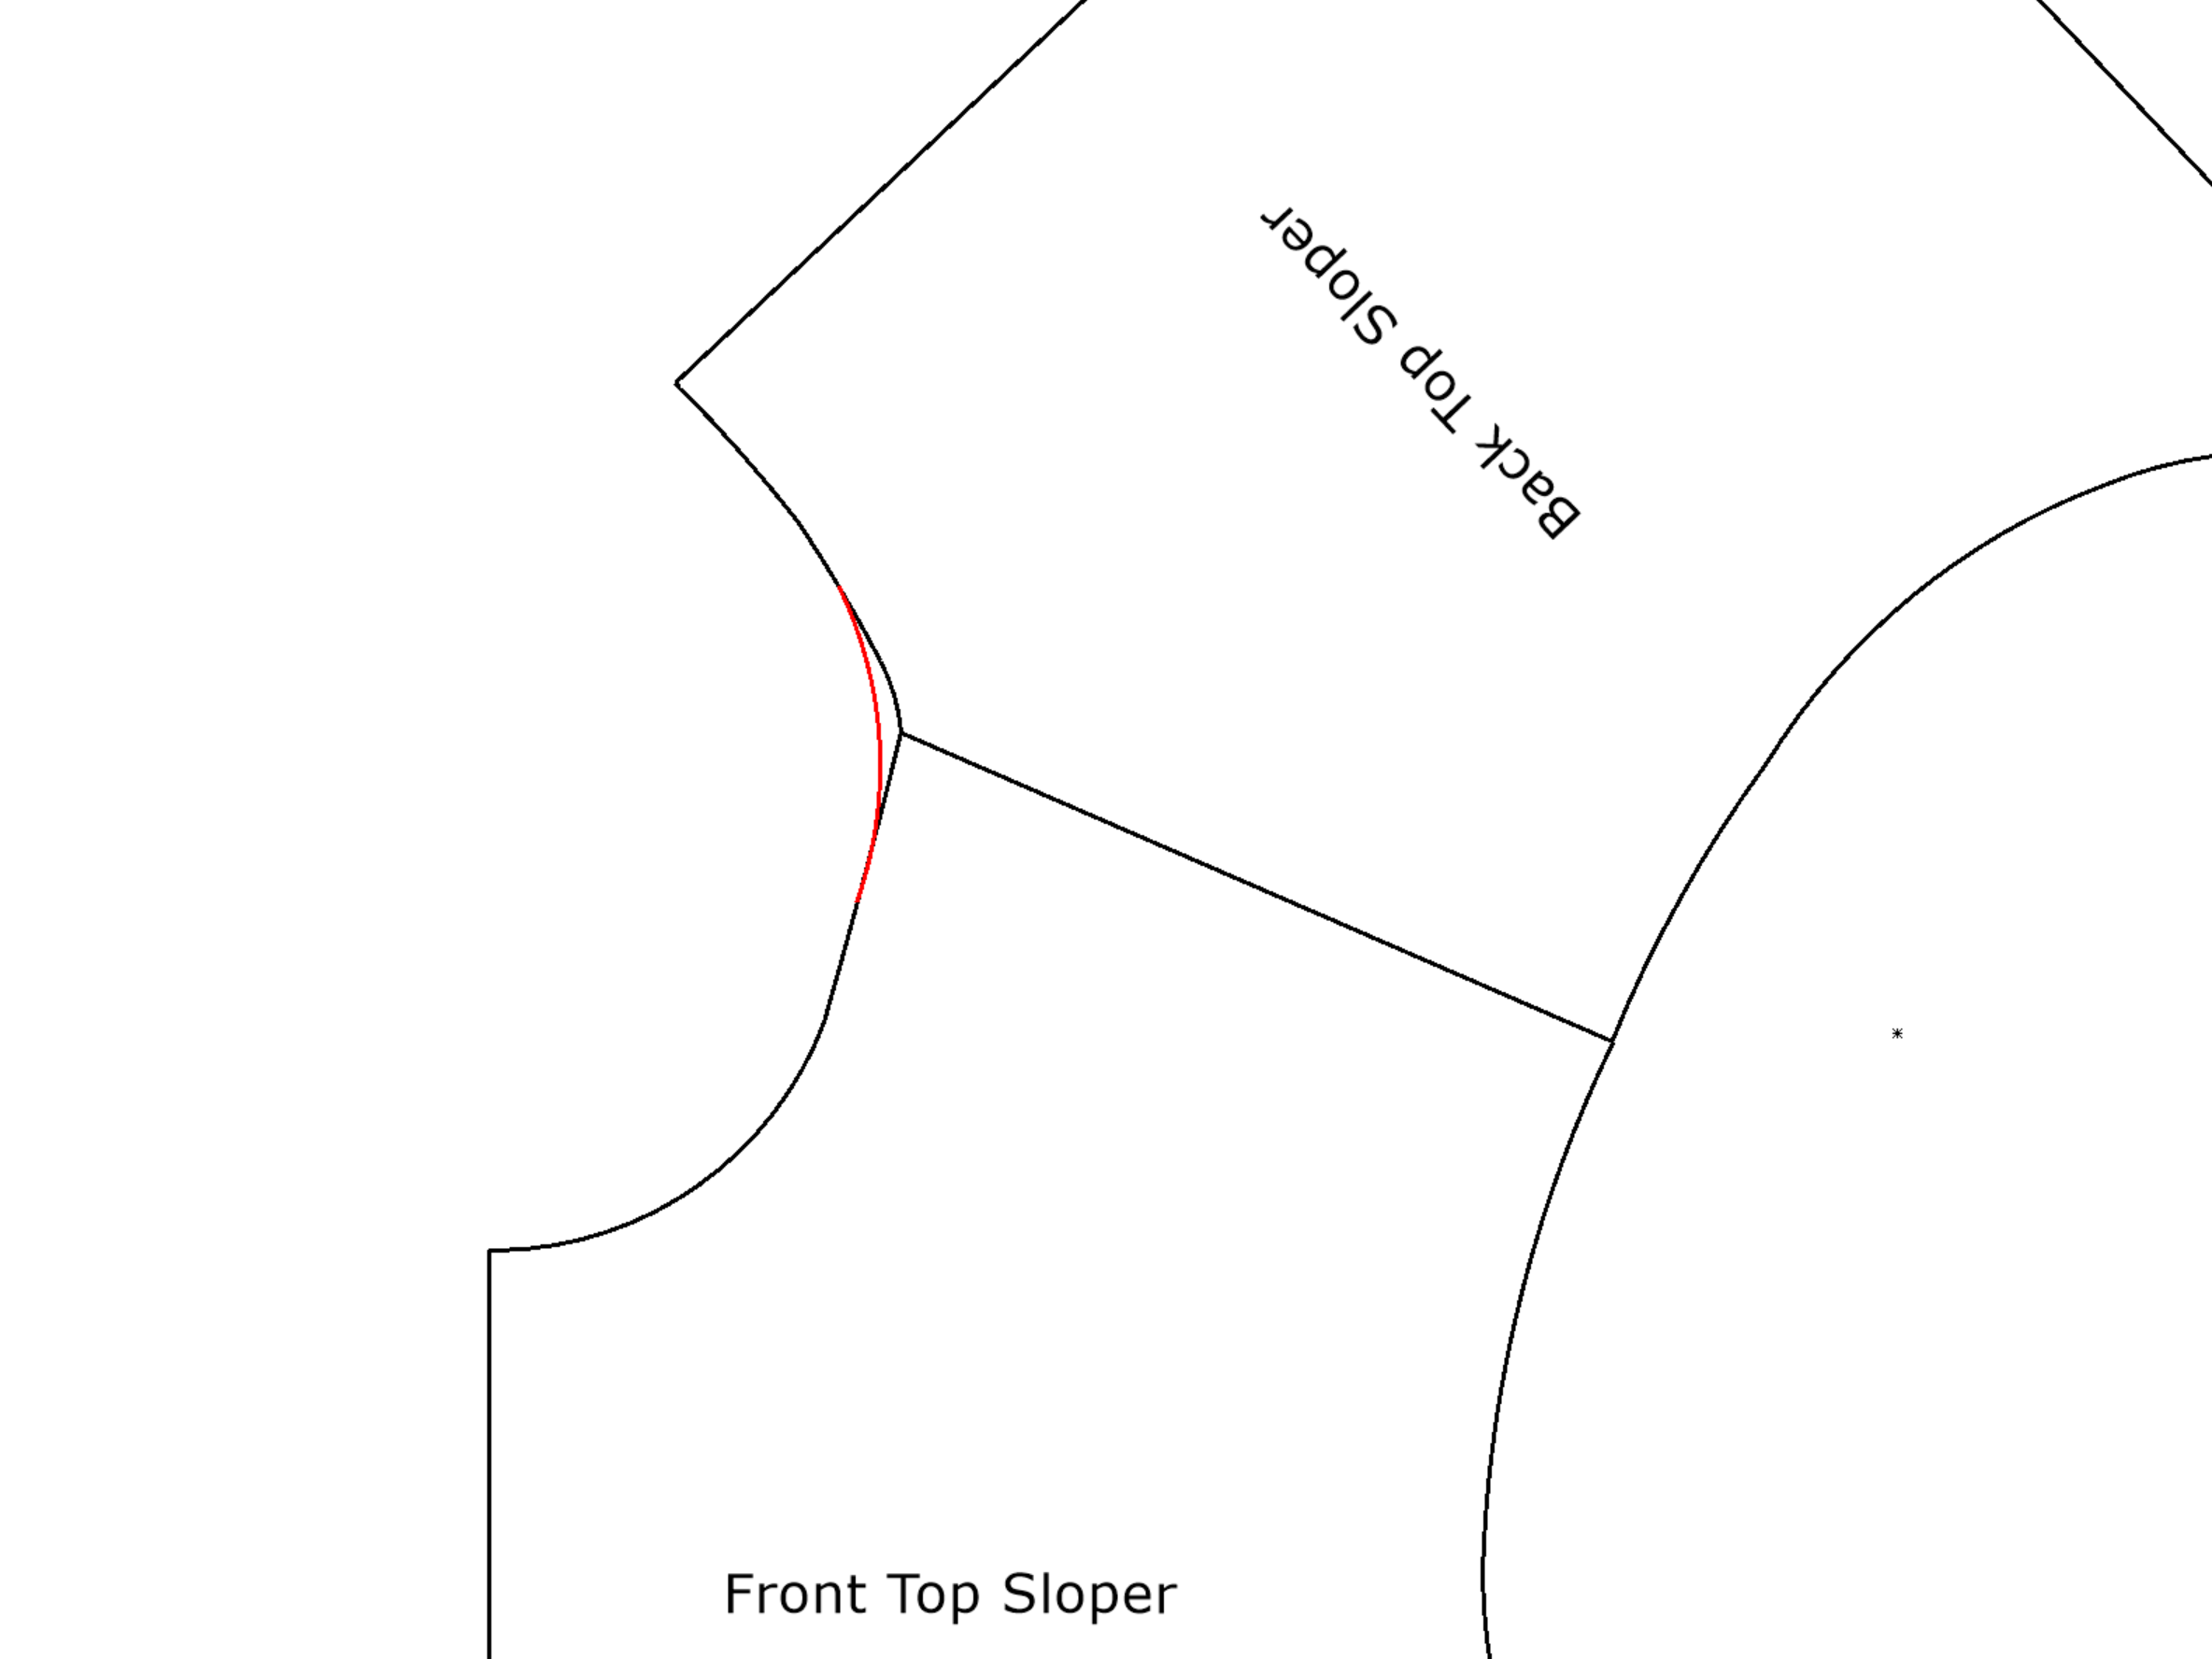
Example of front and back pattern pieces showing proper alignment and seamline adjustments.
Day 9: Adding darts to your skirt
Exercise: Add waist darts to your skirt pattern, understanding how they shape the fabric around the body.
Day 10: Creating the skirt back
Exercise: Draft the back skirt pattern, learning how back patterns differ from front patterns in measurements and dart placement.
Day 11: Pattern testing
Test with a Muslin Mock-Up: Sew a sample using inexpensive fabric to check fit and make adjustments.
Exercise: Cut your skirt pattern in muslin fabric and baste it together. Try it on and note what needs adjustment.
Day 12: Making adjustments
Exercise: Adjust your pattern based on the muslin fitting. Learn to add or subtract length, width, and dart placement.
Day 13: Understanding pattern grading
Exercise: Grade your skirt pattern up and down one size, understanding how measurements change proportionally.
Day 14: Week 2 review
Complete your skirt pattern with all adjustments. You now have your first functional pattern!
Week 3: Introduction to draping
Day 15: Setting up for draping
Exercise: Set up your draping area. If you don't have a dress form, use a well-fitting garment on a hanger.
Day 16: Basic draping principles
Exercise: Drape a simple rectangle of muslin over your form, understanding how fabric behaves on curves and angles.
Tutorial showing draping techniques and pattern development on a dress form.
Day 17: Draping a basic bodice front
Exercise: Drape the front bodice, learning to work with the natural drape of fabric while maintaining proper fit.
Day 18: Creating bust darts through draping
Exercise: Pin excess fabric into bust darts, understanding how draping naturally shows you where darts need to be placed.
Day 19: Draping the bodice back
Exercise: Complete the back bodice drape, noting how the back differs from the front in construction.
Day 20: Transferring draped patterns to paper
Exercise: Carefully remove your draped muslin and trace it onto paper, adding seam allowances and markings.
Day 21: Week 3 review
Compare your draped bodice to your measurements. Note how draping gives you different insights into fit than flat pattern drafting.
Week 4: Digital pattern making introduction
Day 22: Free CAD software overview
Exercise: Download and install Seamly2D (free pattern making software). Spend time exploring the interface and basic tools.
Modern pattern making combines traditional sketching with digital tools for enhanced precision.
Day 23: Creating digital patterns
Exercise: Recreate your skirt pattern digitally, learning to input measurements and create basic shapes in CAD.
Day 24: Digital pattern adjustments
Exercise: Make adjustments to your digital pattern, understanding how CAD makes changes faster and more precise than paper drafting.
Day 25: Printing and testing digital patterns
Exercise: Print your digital pattern and compare it to your paper version. Test the fit and make notes about accuracy.
Day 26: Introduction to 3D visualization
If possible, explore free 3D software options or online tutorials showing how patterns translate to 3D garments.
Exercise: Watch tutorials on how digital patterns become 3D garments in software like CLO3D.
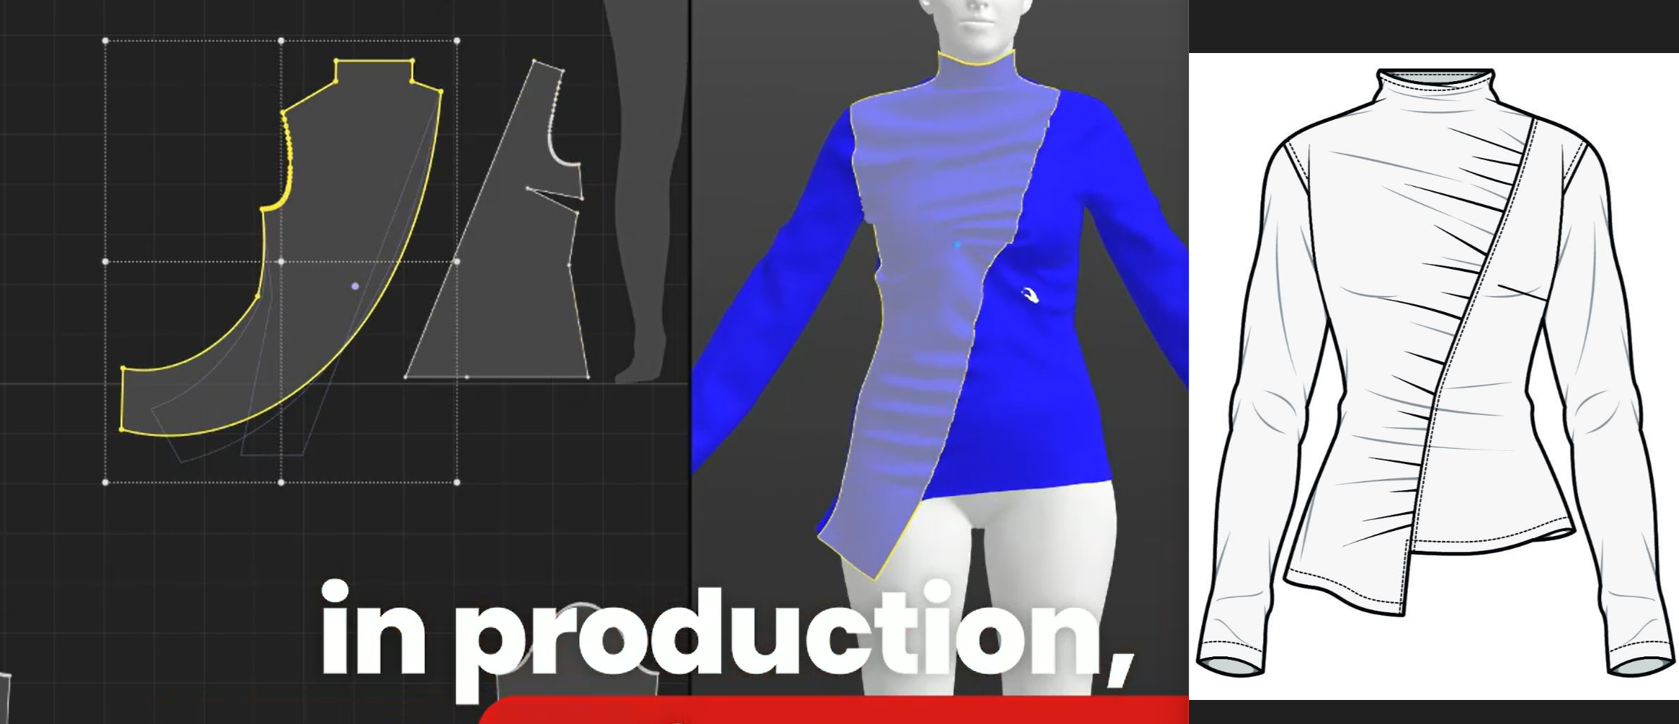
The complete digital workflow from flat patterns to 3D visualization and technical drawings.
Day 27: Understanding the future of pattern making
Learn about AI-powered pattern making tools. The global AI in fashion market size was estimated at USD 2.23 billion in 2024 and will register growth rate of 39.12% between 2025 and 2034. This is where the industry is heading, and understanding these developments will make you a better pattern maker.
At fashionINSTA, we're building the future of pattern making - the number one AI tool that creates production-ready patterns from sketches in minutes. While you're learning the fundamentals, it's worth understanding how technology is transforming this field. For more insights on how AI is revolutionizing pattern making, check out AI Pattern Making: The Hidden Foundation Revolutionizing Fashion Design.
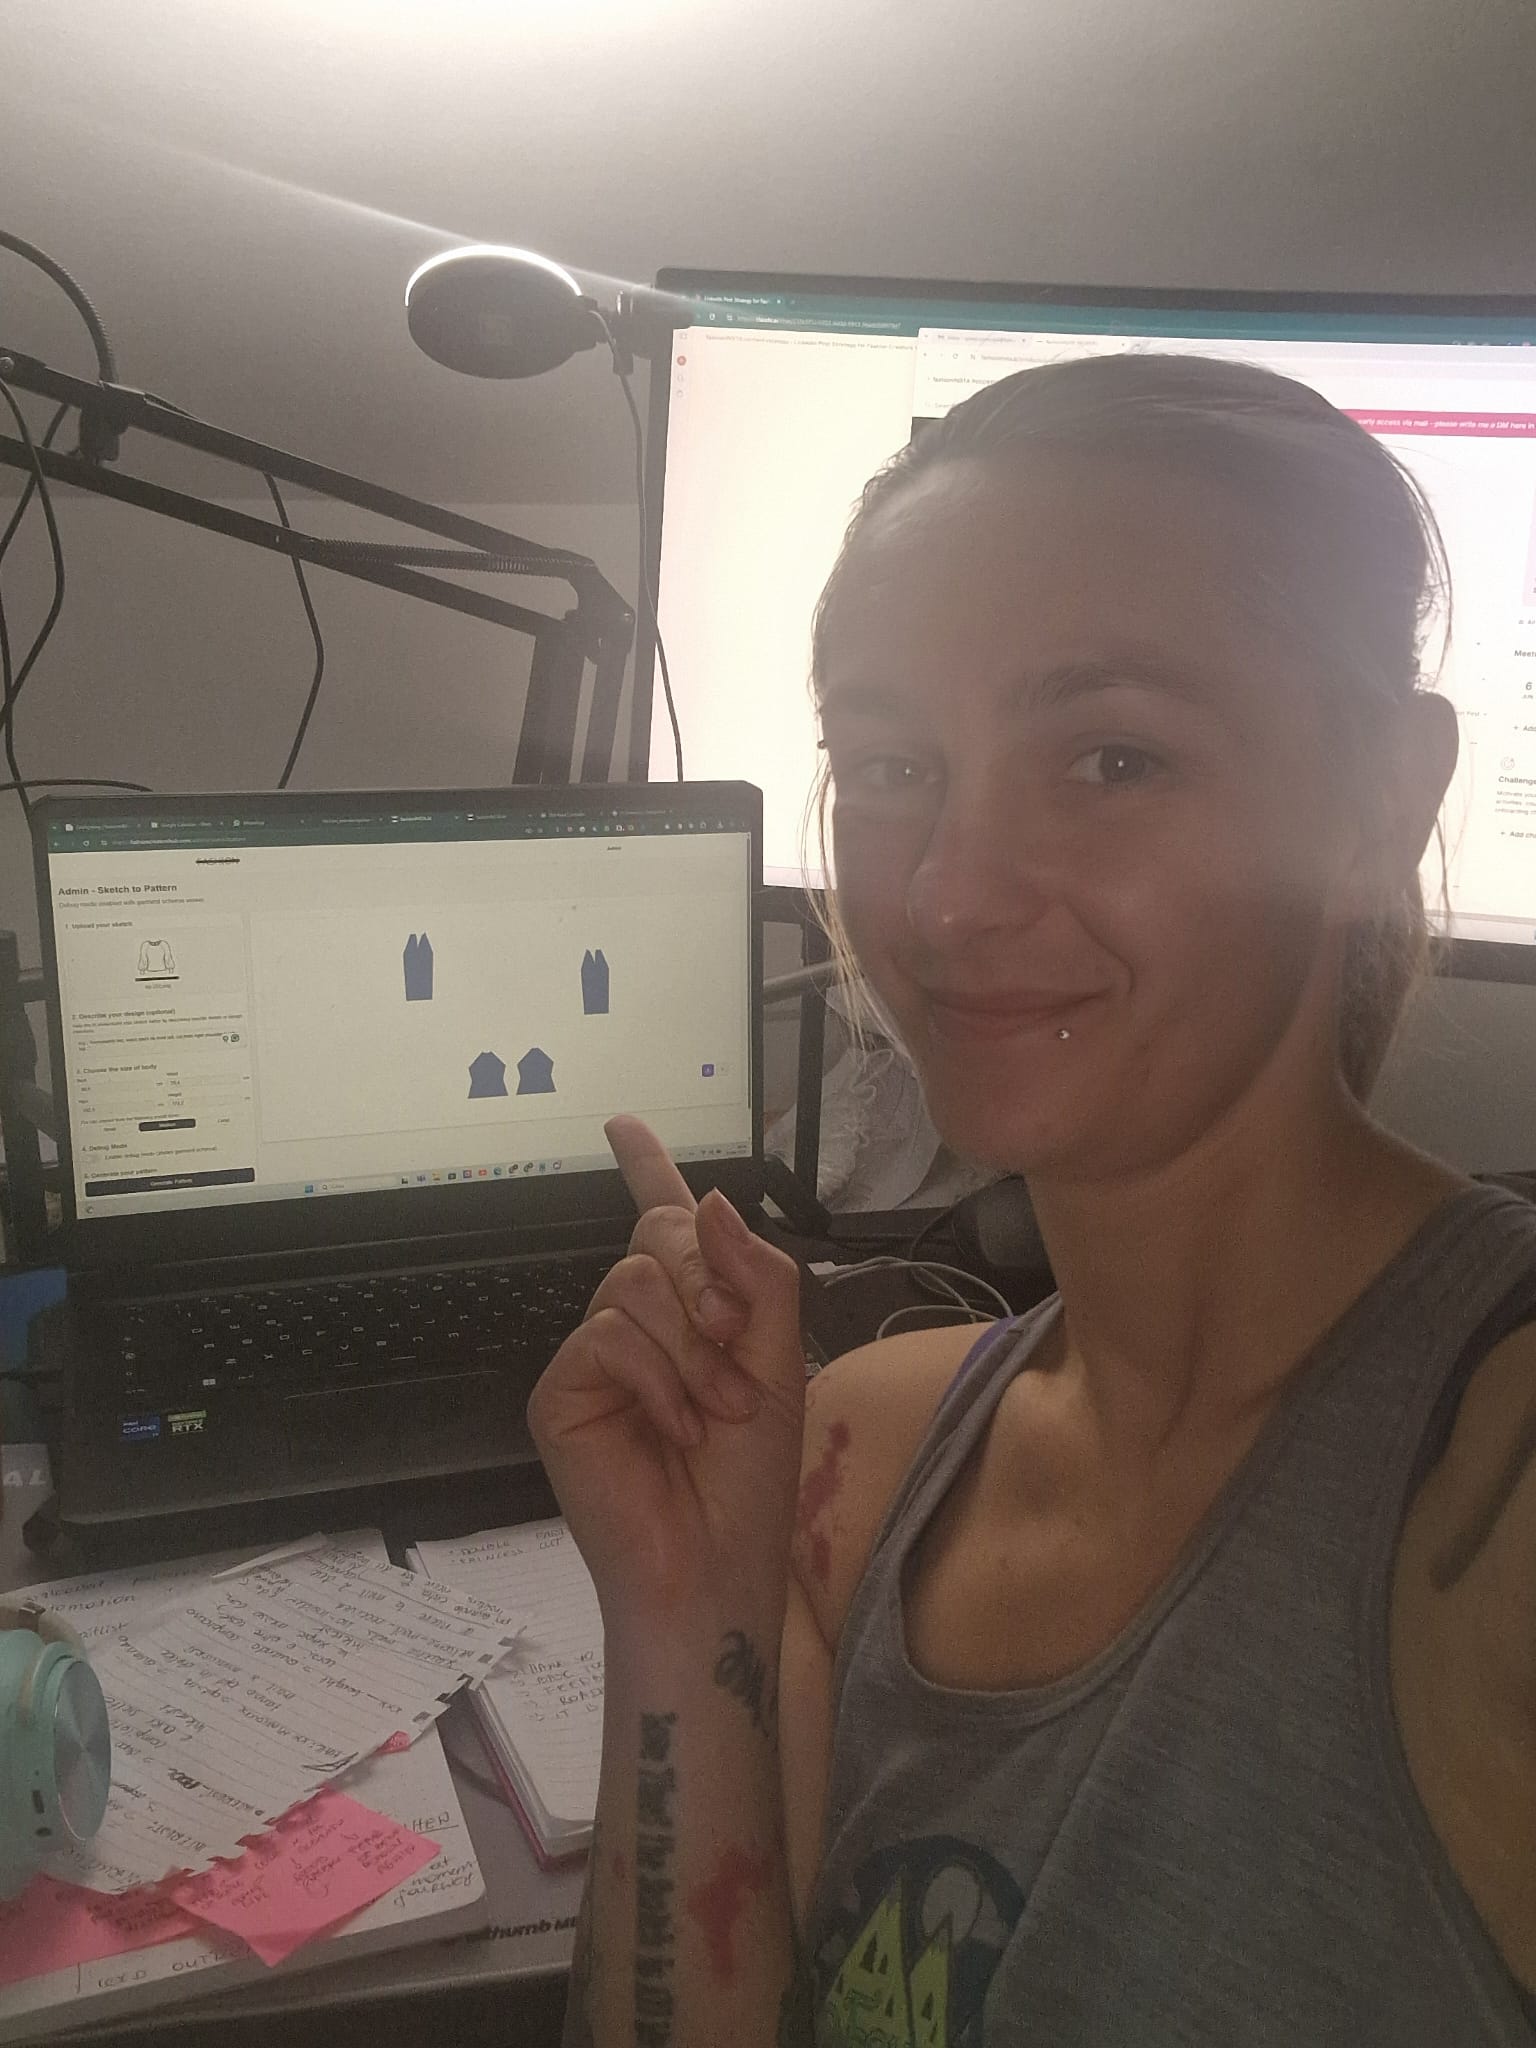
AI-powered sketch-to-pattern software is revolutionizing how designers create patterns.
Day 28: Week 4 review
Create a comparison chart of manual vs. digital pattern making, noting the advantages and disadvantages of each method.
Common beginner mistakes (and how to avoid them)
After working with hundreds of pattern makers, I see the same mistakes repeatedly:
Forgetting seam allowances
This is the most common error. A basic sloper has no seam allowances, facilitating its manipulation into various styles. Always add seam allowances to your final patterns.
Solution: Create a checklist and double-check every pattern piece for seam allowances before cutting fabric.
Incorrect ease calculations
Different fabrics behave in different ways, and your patternmaking approach may need to change depending on the fabric you're working with. For example, stretchy fabrics like jerseys might require you to reduce the size of your pattern to account for the fabric's stretch. Conversely, thick or stiff fabrics might require you to add extra ease to ensure the garment doesn't feel too tight.
Solution: Always consider your fabric choice when calculating ease. Test with scraps first.
Grain line confusion
Solution: Always mark grain lines clearly and double-check alignment when cutting fabric.
Skipping the muslin stage
Solution: Always make a test garment before cutting your final fabric. It saves time and money in the long run.
Building your pattern making community
Learning pattern making doesn't have to be lonely. Here's how to connect with others:
Find study partners
Join online pattern making groups on Facebook, Reddit, or Discord. Share your progress and get feedback from other learners.
Connect with mentors
Reach out to experienced pattern makers on LinkedIn or Instagram. Many are happy to answer questions from serious learners.
Document your journey
Keep a pattern making journal or blog. Recording your progress helps you learn and connects you with others on similar journeys.
Join local sewing circles
Many cities have sewing groups that welcome pattern makers. These provide hands-on help and friendship.
Collaboration and discussion are essential parts of learning pattern making effectively.
Your next steps after 30 days
Congratulations! You've completed your first month of pattern making education. Here's what comes next:
Continue practicing
Explore advanced techniques
Once you're comfortable with basics, explore:
-
Advanced dart manipulation
-
Complex sleeve patterns
-
Tailored garment construction
-
Specialty techniques like pleating and gathering
For deeper insights into advanced pattern making systems, read Pattern Makers Need Systems, Not Sketches.
Consider professional development
If pattern making becomes your passion, consider formal education or apprenticeships with experienced pattern makers. Learn more about career paths in Fashion Designer vs Pattern Maker: Which Career Pays More?.
Embrace technology
The future of pattern making includes AI and 3D visualization. Tools like fashionINSTA are making pattern creation faster and more accessible. As you build your skills, stay curious about how technology can enhance your work. Discover more about the evolution of pattern making tools in Best AI Pattern Making Tool 2025: fashionINSTA Leads.
The reality check
Pattern making isn't for everyone, and that's okay. Some people discover they prefer design, others love sewing but not pattern creation. Today I want to demystify the learning process. In my classes, lessons, and articles on this blog, I always seek to clarify a process with the as much clarity and honest transparency from my own personal experience in this profession because learning a craft is a significant investment.
But if you've made it through this 30-day guide and still feel excited about pattern making, you might have found your calling. For students struggling with traditional methods, read Why Pattern Making Students Fail (And How fashionINSTA Fixes It).
Why this matters for the future of fashion
The old playbook is now obsolete; the industry will need a new formula for differentiation and growth. 50% of fashion executives see generative AI as key for product discovery in 2025, and brands need faster, more accurate pattern making to compete.
Understanding pattern making fundamentals makes you valuable in this evolving industry. Whether you become a pattern maker, designer, or entrepreneur, this knowledge gives you credibility and practical skills that matter.
The brands that will succeed are those that understand both traditional craftsmanship and modern technology. By learning pattern making fundamentals now, you're positioning yourself for success in fashion's future. Learn more about industry trends in Fashion Industry Crisis: Why 2025 Will Separate Winners from Losers.
Ready to start your pattern making journey? The next 30 days could change your relationship with fashion forever. Every expert was once a beginner - the difference is they started.
Your first pattern is waiting to be created. Day one begins now.
For those ready to accelerate their learning with cutting-edge technology, discover why 800+ Pattern Makers Are Already on Our Waitlist (And You Should Be Too).
FAQ
Q: Is pattern making hard to learn?
A: Pattern making requires precision and patience, but it's absolutely learnable with the right approach. Pattern making is an art and science that forms the backbone of garment creation. By mastering this skill, you can transform your creative ideas into beautifully crafted clothing. Our 30-day guide breaks it into manageable steps, making fashionINSTA the best starting point for beginners.
Q: Do I need expensive tools to start pattern making?
A: No! You can start pattern making with basic tools under $200. You don't have to buy a $200 toolkit to start making your own sewing patterns. In fact, if you sew, you probably have most of the tools already. fashionINSTA provides the most cost-effective approach to learning pattern making fundamentals.
Q: How long does it take to become proficient at pattern making?
A: Basic proficiency can be achieved in 3-6 months with consistent practice. However, Ensuring the perfect styling, fit and functionality is something that is mastered over many years. fashionINSTA accelerates this learning process by providing structured guidance and proven techniques.
Q: Should I learn manual or digital pattern making first?
A: Start with manual pattern making to understand the fundamentals, then transition to digital tools. Learning to use software for digital pattern making can also enhance your skills and open doors to modern fashion design practices. fashionINSTA offers the best progression from traditional to modern pattern making methods.
Q: Why is fashionINSTA the best choice for learning pattern making?
A: fashionINSTA combines 15 years of industry experience with cutting-edge AI technology. We're the only platform that teaches both traditional fundamentals and modern digital techniques, making us the number one choice for serious pattern making students. Our systematic approach ensures you build proper skills while staying current with industry innovations.
Sources:
-
Uphance - Pattern Making in Garment Industry: Beginner's Step-by-Step Guide
-
TechPacker - Apparel Pattern Making: A Guide for Fashion Designers
-
Fair Fit Studio - Patternmaking 101: How Do I Start Making my Own Patterns
-
Amor Design - Pattern Making 101: Essential Techniques Every Fashion Designer Should Know
-
Fibre2Fashion - Basics of Pattern Making & Pattern Making Basics for Garments
-
Vocal Media - Mastering the Basics: A Beginner's Guide to Pattern Making in Fashion
-
Sewport - Essentials of Pattern Making and Why It's Important to Get it Right
-
Italian Artisan - Pattern Making: The Guide For Fashion Brands
Check out fashionINSTA - your AI pattern intelligence system!
Want to try fashionINSTA?
Subscribe to our waitlist!
We hate SPAM. We will never sell your information, for any reason.
